Gravity Demonstration Tower

Quick Answer: The Gravity Demonstration Tower is a clear-framed physics display for showing how gravity acts. As pictured, a plumb bob hangs on a thread to mark the true vertical, and a transparent drop tube lets students watch objects fall, supporting lessons on free fall, gravitational acceleration and air resistance.

What the Tower Shows About Gravity

The listing image of the gravity demonstration tower shows a two-level transparent frame held by corner connectors, a clear vertical tube and a pointed plumb bob hanging on a thread from the middle shelf. The plumb bob is the simplest gravity detector there is: whatever surface the tower stands on, the thread settles along the direction of gravity’s pull, which is why builders use a plumb line to check that walls are vertical.

The drop tube turns the display into a free-fall experiment. When air resistance is negligible, every object near Earth’s surface accelerates downward at about 9.8 metres per second squared whatever its mass, so two steel balls of different weight released together land together. Dropping a coin beside a flat piece of paper gives the opposite result, and crumpling the paper into a ball closes the gap, showing that air resistance, not mass, made the difference.

Older students can use the distance fallen and the time taken to estimate g from s = ½gt². Because the fall is short, hand timing with a stopwatch adds a large reaction-time error, so filming the drop with a phone camera at a high frame rate and counting frames gives better data. Timers, light gates and the objects to be dropped are not assumed to be included.

Specifications

Item Framed gravity demonstration display
Frame Transparent panels on corner connectors, as pictured
Vertical reference Plumb bob suspended on a thread
Drop path Clear vertical tube for observing falling objects
Demonstrates Direction of gravity, free fall, effect of air resistance
Height and tube bore Confirm at enquiry

Applications

  • Showing that gravity acts vertically downward with a plumb line
  • Comparing the fall of objects of different mass and shape
  • Estimating g from drop height and fall time
  • Discussing Galileo’s reasoning on falling bodies and air resistance

Care & Handling

  • Place the tower on a level, stable surface and let the plumb bob come to rest before observations.
  • Drop only small, smooth objects that pass freely through the tube, and cushion the landing point at the bottom.
  • Clean the transparent panels with a damp soft cloth; solvents craze clear plastics.
  • Check the corner connectors for tightness if the frame starts to wobble.

Why Choose LabEquip

Physics teachers usually buy this tower for demonstrations at the front of the class, where its clear frame lets everyone see the plumb line and the drop path. LabEquip lists it in the STEM kits range, and it complements the Newton’s Second Law Demonstration Apparatus when a unit moves from free fall to force and acceleration. Contact us through the contact page.

Frequently Asked Questions

Do heavy objects fall faster than light ones?

Not when air resistance is negligible. All objects accelerate at the same rate under gravity, about 9.8 metres per second squared near Earth’s surface. A heavy ball and a light ball of the same size dropped together land at almost the same moment.

Why does a sheet of paper fall more slowly than a coin?

The flat paper has a large surface area compared with its weight, so air resistance slows it a lot. Crumple the same paper into a tight ball and it falls almost as fast as the coin, showing that shape and air resistance, not mass, caused the difference.

What does the plumb bob show?

A plumb bob hanging freely lines up with the direction of gravity, pointing towards the centre of the Earth. The thread therefore marks the true vertical, a principle builders and surveyors still rely on.

How can students measure g with the tower?

Measure the drop height, time the fall and calculate g as twice the height divided by the time squared. Because the fall lasts only a fraction of a second, filming it in slow motion and counting frames gives a more reliable time than a hand-held stopwatch.

Would a feather and a hammer fall together in a vacuum?

Yes. Without air, everything falls at the same rate. Astronaut David Scott showed this on the Moon in 1971 during Apollo 15 by dropping a hammer and a feather, which landed together.

Which classes use the gravity tower?

It suits middle-school lessons on forces and gravity and senior classes studying free fall and the equations of motion. It is also a useful exhibit for science days, where visitors can try the coin and paper comparison themselves.

Last Updated: September 2026
Angle Between Two Mirrors Apparatus

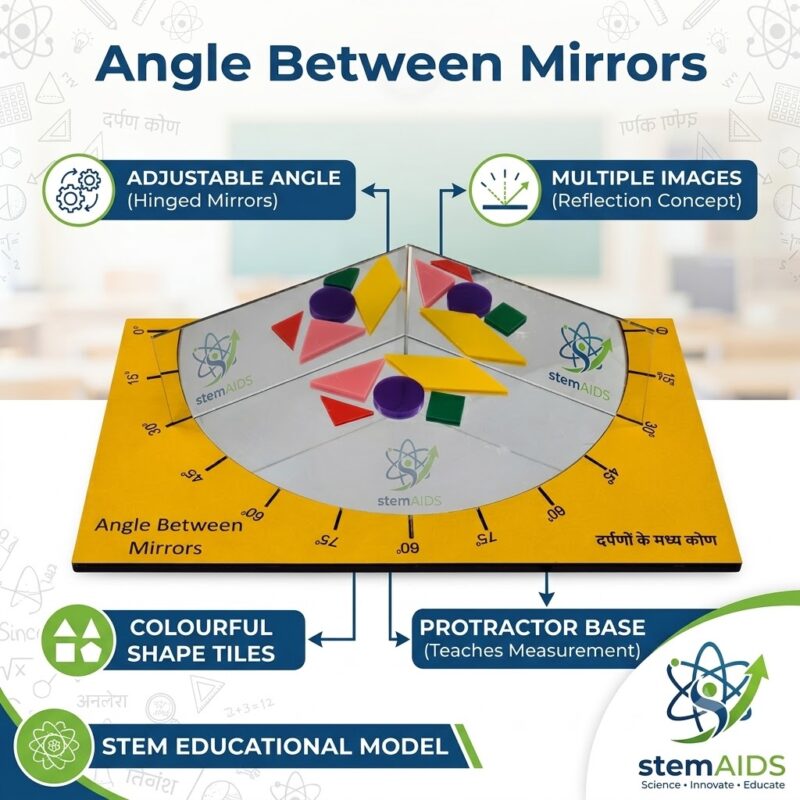
Quick Answer: The Angle Between Two Mirrors Apparatus is a pair of plane mirrors hinged together on a protractor base, used to study multiple images. Students place an object between the mirrors, set the angle, count the images and check the result against the formula n = 360°/θ − 1, which also explains how a kaleidoscope works.

Counting Images at Set Angles

The listing image of the angle between two mirrors apparatus shows two hinged mirrors standing on a base marked in degrees, with brightly coloured shape tiles to place between them. Because the hinge line sits at the centre of the scale, the angle between the mirrors can be read directly, and a tile placed near the hinge is reflected again and again, forming a ring of images.

Each image formed by one mirror acts as an object for the other, so light can reflect several times before reaching the eye. When 360 divided by the angle gives an even whole number, as at 90, 60 or 45 degrees, the number of images is that quotient minus one: three images at 90 degrees, five at 60 and seven at 45. When the quotient is odd, as at 72 or 120 degrees, the count depends on where the object sits, which makes a good investigation for older students.

Recording the count at several angles and plotting it against the angle shows the number rising sharply as the mirrors close. At zero degrees the mirrors become parallel and the number of images becomes unlimited in principle, the idea behind the infinity mirror. The coloured tiles also turn the activity into a symmetry lesson, since the images build patterns with rotational and reflective symmetry just as a kaleidoscope does.

Applications

  • Verifying the image-number formula at 90, 60, 45 and 30 degrees
  • Graphing the number of images against the mirror angle
  • Symmetry and pattern work in mathematics using the coloured tiles
  • Explaining how a kaleidoscope creates its repeating patterns

Specifications

Item Two hinged plane mirrors on a protractor base
Angle scale Degree markings on the base for setting the mirror angle
Objects Coloured shape tiles, as shown in the listing image
Formula tested n = 360°/θ − 1 for even quotients
Related topics Multiple reflection, symmetry, kaleidoscope
Mirror and base size Confirm at enquiry

Care & Handling

  • Open and close the hinge gently and support both mirrors while changing the angle.
  • Clean the mirror faces with a soft cloth and avoid rubbing the silvered back or the edges.
  • Keep the protractor scale clean and dry so the markings stay readable.
  • Store the mirrors closed, face to face with a soft sheet between them, to prevent scratches.

Why Choose LabEquip

Physics teachers use this apparatus for the multiple-images practical, and mathematics teachers borrow it for symmetry lessons. LabEquip lists it in the STEM kits range; pair it with the Reflection of Light Experiment Kit for single-mirror ray work or the Infinite Reflection Mirror Model to show the parallel-mirror limit. Send enquiries through the contact page.

Frequently Asked Questions

What is the formula for the number of images between two mirrors?

When 360 divided by the angle is an even number, the number of images equals 360 divided by the angle, minus one. At 90 degrees there are three images, at 60 degrees five and at 45 degrees seven.

What happens when 360 divided by the angle is odd?

Then the count depends on the position of the object. If the object lies on the line bisecting the angle, the number of images is the quotient minus one; if it is off that line, the number equals the quotient. Students can test both positions at 72 or 120 degrees.

Why are some images dimmer than others?

Images at the back of the ring are formed after more reflections, and a little light is lost at each reflection. They therefore look slightly fainter than the first images seen directly in each mirror.

How does this relate to a kaleidoscope?

A kaleidoscope usually contains two or three mirrors set at 60 degrees. Coloured pieces at one end are reflected repeatedly, producing a symmetrical pattern, the same effect students see around the tiles in this apparatus.

What happens when the mirrors are parallel?

The angle becomes zero and, in theory, an unlimited number of images forms, receding into the distance. In practice light losses make the far images too faint to see, as in an infinity mirror.

What should students record in the practical?

They should record the angle, the number of images counted and the number predicted by the formula, repeating for several angles. A table and a graph of image count against angle make the relationship clear.

Last Updated: September 2026

Acid Base Experiment Kit

Quick Answer: The Acid Base Experiment Kit is a school chemistry set for classifying solutions as acidic, neutral or alkaline using indicators. Students test samples in test tubes, watch colour changes, place results on the pH scale and neutralise an acid with a base, learning the basic ideas of acid-base chemistry through practical work.

What Students Investigate

The listing image of the acid base experiment kit shows a rack of test tubes, reagent bottles, droppers and a test-tube brush, with students carrying out colour tests. Indicators are substances whose colour depends on acidity. Litmus turns red in acid and blue in alkali, phenolphthalein stays colourless in acid and turns pink in alkali, and universal indicator runs through a spectrum of colours that can be matched to pH values from 0 to 14.

A typical first practical tests everyday samples such as lemon juice, vinegar, soap solution, baking soda solution and tap water, and sorts them into groups. Students then learn that pH 7 is neutral, lower numbers are acidic and higher numbers alkaline, and that each step on the scale is a tenfold change in hydrogen ion concentration. Natural indicators make a good extension: red cabbage extract passes through several colours, and turmeric turns reddish-brown in soap and other alkaline solutions.

Neutralisation brings the topic together. Adding a base to an acid a few drops at a time, with indicator present, shows the colour switch at the point where the acid is used up, and a word equation such as hydrochloric acid plus sodium hydroxide giving sodium chloride and water follows naturally. The reagents and indicators actually supplied should be confirmed when ordering, and their safety data sheets read before use.

Specifications

Item Indicator-based acid and base experiment set
Apparatus shown Test tubes, rack, droppers and reagent bottles, as in the listing image
Tests Colour change with indicators to classify acidic, neutral and alkaline samples
Scale used pH 0 to 14
Level Middle and secondary school chemistry
Reagents and indicators included Confirm at enquiry

Care & Handling

  • Wear safety goggles for all tests and keep acids and alkalis at the dilute strengths used in school practicals.
  • Read the safety data sheet for each reagent and store acids and alkalis apart, in closed, labelled bottles.
  • Rinse any splash on skin with plenty of running water and tell the teacher.
  • Wash test tubes and droppers after each session so indicator residues do not affect the next test.

Applications

  • Classifying household substances as acids, bases or neutral
  • Introducing the pH scale with universal indicator
  • Demonstrating neutralisation, including antacid and soil-treatment examples
  • Preparing natural indicators from red cabbage, turmeric or flower petals

Why Choose LabEquip

Science teachers usually order this kit for practicals on acids, bases and salts from Class 7 to Class 10, where each group needs its own tubes and indicators. LabEquip lists it in the STEM kits range and supplies the glassware and stands for a full practical through its chemistry lab equipment range. Tell us what quantities you need through the contact page.

Frequently Asked Questions

Which indicators are used to test acids and bases?

Litmus is the classic one, turning red in acid and blue in alkali. Phenolphthalein turns pink in alkali and stays colourless in acid, methyl orange turns red in acid and yellow in alkali, and universal indicator shows a range of colours linked to pH.

What does the pH scale measure?

It measures how acidic or alkaline a solution is, from 0 to 14. pH 7 is neutral, values below 7 are acidic and values above 7 are alkaline. Each whole-number step represents a tenfold change in hydrogen ion concentration.

What happens during neutralisation?

An acid reacts with a base to form a salt and water. With an indicator present, the colour changes at the point where the acid has been used up, which is how titrations find the exact amount of base needed.

Can household items be tested?

Yes, and they make the lesson memorable. Lemon juice and vinegar are acidic, baking soda and soap solutions are alkaline, and pure water is close to neutral. Avoid strong cleaners such as drain or toilet cleaners, which are corrosive.

How can students make a natural indicator?

Chop red cabbage, soak it in hot water and strain off the purple liquid once it cools. It turns red or pink in acids and green or yellow in alkalis. Turmeric solution or turmeric paper is another option, turning reddish-brown in alkali.

What safety precautions apply?

Wear goggles, use dilute solutions, add acid to water and never the reverse, and never taste chemicals or smell them directly. Wipe up spills at once and wash hands after the practical.

Last Updated: September 2026

Magnet Learning Kit

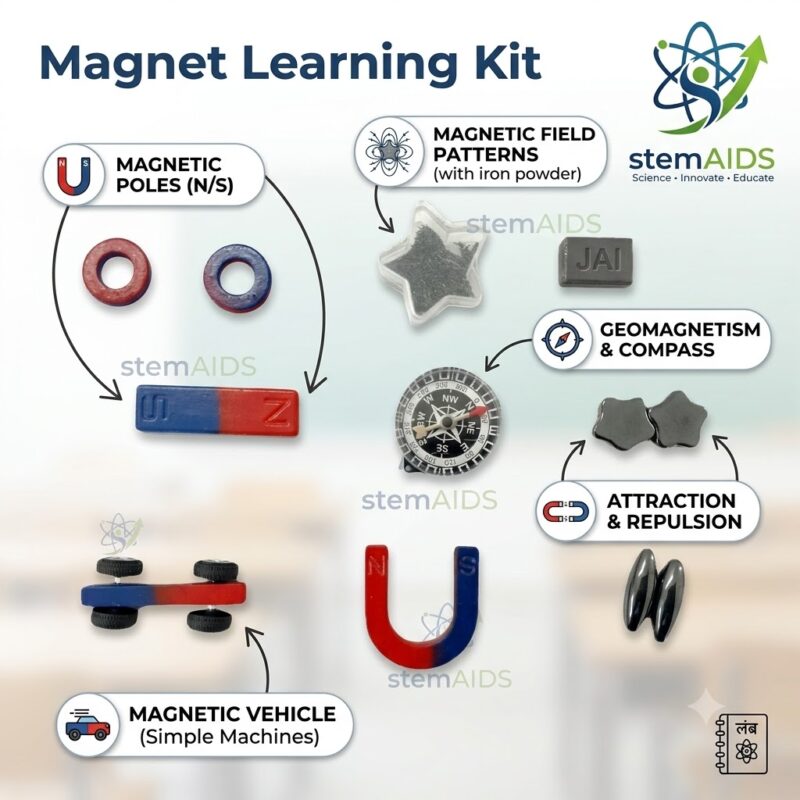
Quick Answer: The Magnet Learning Kit is a hands-on science set of assorted magnets and accessories for investigating magnetism. Students test which materials are attracted, find north and south poles, see like poles repel and unlike poles attract, and map magnetic field patterns, building the basic ideas that later lead to electromagnetism.

Magnetism Activities the Kit Supports

The listing image of the magnet learning kit shows bar, horseshoe and ring magnets, shaped magnets, a compass, a small magnetic vehicle and iron powder for revealing field patterns. The exact contents should be confirmed when ordering, but a set like this covers the magnetism activities that school syllabi ask for from the primary years onward.

Most lessons start with sorting. Students predict which objects a magnet will pick up and find that only some metals respond, mainly iron, steel, nickel and cobalt, while aluminium, copper and plastics do not. Next they discover poles by dipping a bar magnet into iron filings and seeing the filings cluster at the ends, and hang a magnet freely to show that it settles pointing north and south. Bringing two magnets together shows repulsion between like poles, which is also the only sure test that an object is a magnet, since plain iron is attracted too.

Field patterns make the invisible visible. Sprinkling iron filings on a sheet of paper over a magnet, or moving a small compass around it, reveals lines running from pole to pole, crowded where the field is strong. Ring magnets stacked on a pencil float apart when like poles face each other, a simple model of magnetic levitation, and a magnet-driven vehicle turns attraction and repulsion into motion.

Applications

  • Sorting magnetic and non-magnetic materials in primary science
  • Identifying poles and testing the law of magnetic poles
  • Drawing field lines with iron filings and a plotting compass
  • Using a compass to find directions and discussing Earth’s magnetic field
  • Levitation and magnetic-vehicle challenges in STEM clubs

Specifications

Item Assorted magnetism activity set
Magnet shapes Bar, horseshoe and ring magnets, as shown in the listing image
Field mapping Iron powder and compass
Activity piece Magnetic vehicle for attraction and repulsion games
Topics Poles, attraction and repulsion, field patterns, magnetic materials
Full contents and quantities Confirm at enquiry

Care & Handling

  • Keep small magnets away from young children who might swallow them; swallowed magnets can attract each other inside the body and cause serious harm.
  • Store bar magnets in pairs with unlike poles side by side and keepers across the ends, so they keep their strength.
  • Do not drop or hammer magnets, and keep them away from heat, which weakens magnetism.
  • Keep magnets away from phones, bank cards, computers and anyone with a pacemaker.
  • Keep iron filings in a sealed shaker or a clear plastic bag so they do not stick to the magnets.

Why Choose LabEquip

Primary and middle-school science teachers usually buy one magnet kit per group so every student handles the magnets rather than watching. LabEquip lists it in the STEM kits range; teachers moving on to electromagnetism can pair it with the Series and Parallel Circuit Kit for the circuit side of the topic. Share your class numbers through the contact page.

Frequently Asked Questions

Which materials are attracted by a magnet?

Iron, steel, nickel and cobalt, and alloys containing them, are attracted. Most other metals, such as copper, aluminium, brass and gold, are not, and neither are wood, plastic or glass.

How can students tell if an object is a magnet?

Repulsion is the reliable test. A magnet attracts any piece of iron, magnetised or not, but only another magnet can be pushed away. If one end of the object repels a pole of a known magnet, the object is a magnet.

Why does a freely suspended magnet point north?

Earth behaves like a huge magnet. A freely hanging magnet lines up with Earth’s magnetic field, so its north-seeking pole points towards geographic north. A compass needle is simply a small, light magnet on a pivot.

How do iron filings show a magnetic field?

Each filing becomes a tiny magnet in the field and turns to line up with it. Together they form lines running from one pole to the other, crowded near the poles where the field is strongest.

Can magnets lose their magnetism?

Yes. Heating, dropping or hammering can weaken them, and storing magnets with like poles together slowly demagnetises them. Keepers across the poles of bar and horseshoe magnets help them hold their strength.

Is the kit safe for primary pupils?

With supervision, yes. Larger magnets are easy to handle, but small magnets and iron powder should be managed by the teacher, and pupils should wash their hands after using filings.

Last Updated: September 2026
Arduino Learning Kit

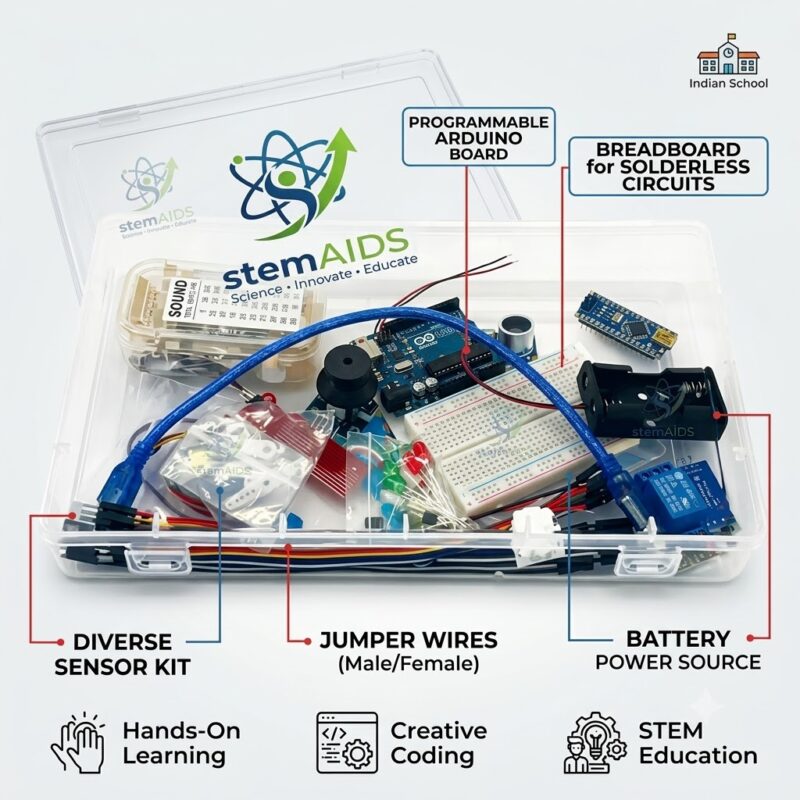
Quick Answer: The Arduino Learning Kit is a microcontroller starter set for schools, built around a programmable Arduino-type board that students connect to LEDs, sensors and other parts on a solderless breadboard. They write short programs on a computer, upload them to the board and watch the code switch lights, read sensors and control outputs.

From First Blink to Sensor Projects

The listing image of this Arduino learning kit shows a programmable board, a solderless breadboard, jumper wires, an assortment of sensor modules and a battery power source packed in a clear case. The breadboard is what makes the kit classroom-friendly: components push into rows of connected holes, so circuits can be built, changed and taken apart without soldering.

Programs, called sketches, are written in the free Arduino IDE in a simplified form of C++, and every sketch has two parts: setup, which runs once, and loop, which repeats for as long as the board is powered. The traditional first task is blinking an LED, which teaches digital output and timing. From there students read a push button, measure light with a light-dependent resistor through an analog input, and use pulse-width modulation to dim an LED or set a servo angle.

Because the same boards appear in hobby projects, university labs and industrial prototypes, skills learned with the kit carry forward. Schools should confirm the exact board model, the sensors included and whether a USB cable is supplied, and plan for one computer per group with the IDE installed.

Specifications

Item Microcontroller learning kit
Controller Programmable Arduino-type board
Prototyping Solderless breadboard and male and female jumper wires
Inputs Assorted sensor modules, as shown in the listing image
Programming Arduino IDE on a computer, sketches uploaded over USB
Board model and parts list Confirm at enquiry

Applications

  • Introducing text-based programming with immediate physical results
  • Building traffic-light, night-light and alarm projects in STEM classes
  • Logging sensor readings for science investigations
  • Equipping tinkering labs, robotics clubs and science fair teams

Care & Handling

  • Disconnect power before changing wiring, so a misplaced wire cannot short the board.
  • Hold the board by its edges and keep it on a non-conductive surface; loose metal parts underneath can short the pins.
  • Store sensors and components in labelled compartments so small parts are not lost between lessons.
  • Unplug jumper wires by the plastic housing, not the wire, to avoid breaking them.

Why Choose LabEquip

Computer science teachers, tinkering lab coordinators and robotics club mentors usually order this kit in sets of one per group, often with spare components. LabEquip lists it in the STEM kits range, and it follows on well from the Series and Parallel Circuit Kit, which gives students the circuit basics first. Send group numbers through the contact page.

Frequently Asked Questions

Do students need programming experience to start?

No. The first sketches are short and are usually built up from the examples included in the Arduino IDE. Students learn variables, loops and conditions by changing working code and seeing what happens to the circuit.

What software is needed?

The Arduino IDE, a free program for Windows, macOS and Linux, or its online editor. Block-based editors that generate Arduino code are also available for younger learners who are not ready for typed code.

What is a breadboard for?

A breadboard holds components and wires in rows of connected sockets, so circuits can be assembled without soldering. It lets students correct mistakes quickly and reuse the same parts for many projects.

Can the board be damaged by wrong wiring?

Yes. A short between the power pins, or too much current drawn from an output pin, can damage it. Using a resistor with every LED, checking the circuit before powering it and disconnecting power while rewiring prevents most problems.

What is the difference between digital and analog pins?

Digital pins read or set two states, on or off. Analog input pins measure a voltage and report it as a number, usually from 0 to 1023, which lets the board read sensors such as light-dependent resistors or potentiometers.

What projects can a class build first?

Common first projects are a blinking LED, a traffic-light sequence, a push-button counter, a night light that switches on in the dark and a temperature display. Each adds one new idea, so the class moves from outputs to inputs to decisions in code.

Last Updated: September 2026

DIY 3D Hologram Maker Set

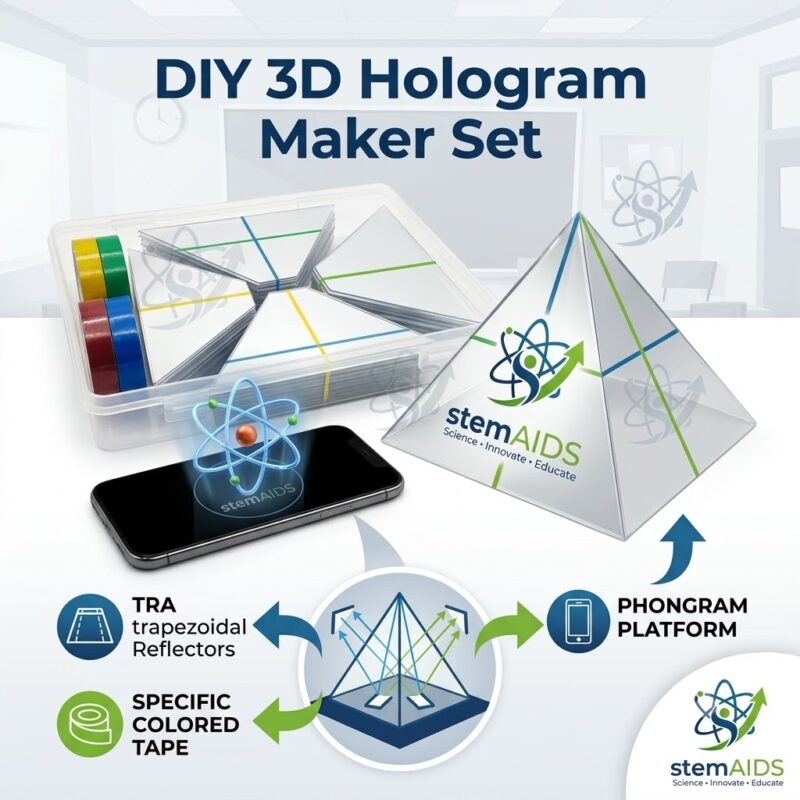
Quick Answer: The DIY 3D Hologram Maker Set is a build-it-yourself optics kit for making a clear four-sided pyramid that sits on a smartphone screen. When a special four-view video plays, each face reflects one view toward the viewer, and together they create a floating image in the middle, the illusion known as Pepper’s ghost.

What the Pyramid Actually Does

The listing image of the DIY 3D hologram maker set shows transparent trapezoidal reflector sheets, coloured tape for joining them and a platform for a phone, with the finished pyramid placed on the screen. Each side of the pyramid is tilted at about 45 degrees to the screen, so light from the part of the video beneath that side is reflected out horizontally to the viewer.

The picture is really a reflection, a virtual image that seems to hang inside the pyramid, so strictly it is not a hologram. A true hologram records the interference pattern of laser light and rebuilds the whole wavefront, whereas this effect is the stage trick named after John Henry Pepper, who used an angled sheet of glass to put ghosts on a Victorian theatre stage. Explaining that distinction is one of the most useful outcomes of the project.

Building the pyramid also teaches careful making. Students measure and cut or fold the four trapezoids to match, tape the edges squarely and learn that small errors in angle make the four views misalign. Videos for the effect show the same object four times around a black centre; many are freely available, and older students can make their own with free video software. Whether the phone platform and a cutting template are included should be confirmed when ordering.

Care & Handling

  • Peel any protective film from the sheets only after cutting, so the faces stay free of scratches.
  • Clean the sheets with a soft cloth; paper towels leave fine scratches that blur the image.
  • Store the finished pyramid in a box so the taped edges are not crushed.
  • Take care with craft knives or scissors if the sheets need trimming, and cut on a mat.

Applications

  • Optics lessons on reflection, virtual images and partial reflection
  • Design-and-make projects where accuracy of construction affects the result
  • Digital media activities in which students produce their own four-view videos
  • Science fair exhibits explaining why the display is not a true hologram

Specifications

Item Build-your-own smartphone reflection pyramid set
Reflectors Four transparent trapezoidal sheets
Assembly Coloured tape to join the sheets, as shown in the listing image
Display source Smartphone or tablet playing a four-view video (device not assumed to be included)
Effect Floating virtual image by Pepper’s ghost reflection
Platform and template contents Confirm at enquiry

Why Choose LabEquip

Teachers running STEM clubs, maker spaces or optics projects usually choose this set because the build fits into one session and the result impresses. LabEquip lists it in the STEM kits range, and teachers who want to take the reflection theme further often add the Reflection of Light Experiment Kit for measured ray work. Contact us through the contact page.

Frequently Asked Questions

Is the image a real hologram?

No. It is a reflected virtual image, the same illusion as the Pepper’s ghost stage trick. A true hologram is recorded with laser light and shows depth by rebuilding the light waves, while this effect relies on angled transparent sheets reflecting a flat video.

Why do the sheets need to be at 45 degrees?

A sheet tilted at 45 degrees to the screen reflects light rising from the screen out sideways towards the viewer’s eye. At other angles the reflected image tilts or moves out of view, so the four images no longer meet at the centre.

What kind of video should be played?

Use a hologram-style video showing the same object four times, arranged around a black centre with each view turned to face one side of the pyramid. The black background matters, because bright areas would reflect too and wash out the floating image.

Why does the effect look better in a dark room?

The reflection is faint compared with room light passing through the sheets. In a darkened room the only bright thing is the reflected video, so the image appears to float with nothing competing for attention.

Can any smartphone be used?

Most phones work if the narrow end of the pyramid fits the screen and the brightness is turned up. Larger screens give a larger image, and a tablet can be used if the pyramid is scaled up to match.

What skills does the project build?

Students practise measuring, cutting and assembling to a tolerance, apply the law of reflection to explain the effect, and use digital tools if they create their own four-view videos. It combines design, physics and media work in one activity.

Last Updated: September 2026

Reflection of Light Experiment Kit

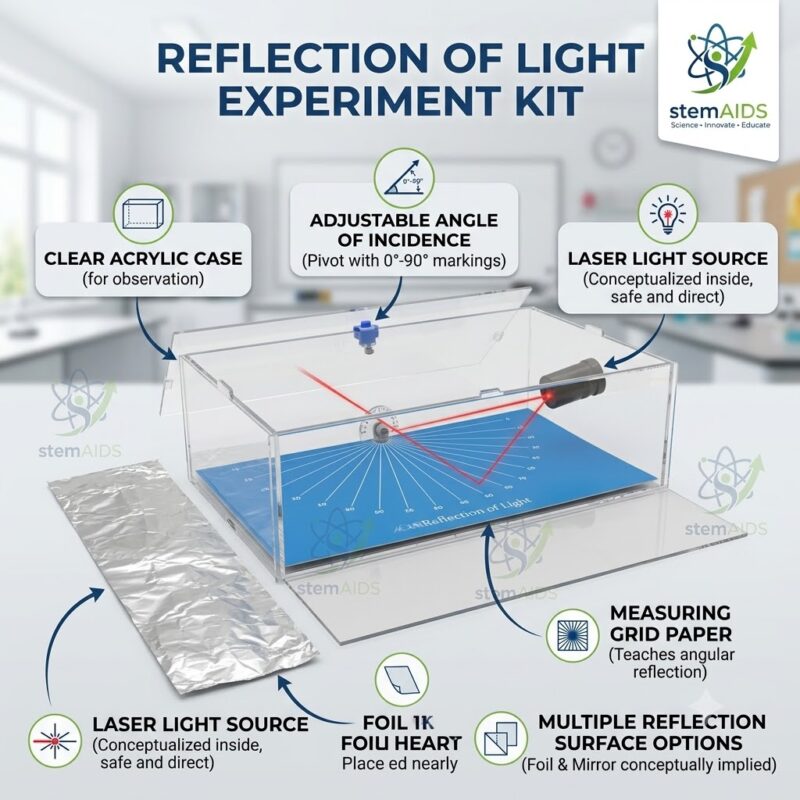
Quick Answer: The Reflection of Light Experiment Kit is a school optics set for verifying the laws of reflection. A narrow beam of light is aimed at a reflecting surface over grid paper inside a clear case, and students measure the angle of incidence and the angle of reflection from the normal to show that they are equal.

Verifying the Laws of Reflection

The listing image of the reflection of light experiment kit shows a clear acrylic case over measuring grid paper, a narrow light source that can be aimed at different angles of incidence, and reflecting surfaces including foil. Students draw the normal, a line at right angles to the reflecting surface, and read the angles on either side of it for several beam directions.

Two laws come out of the results. The angle of incidence equals the angle of reflection, and the incident ray, the reflected ray and the normal all lie in the same plane. Repeating the measurement at five or six angles and tabulating the pairs gives stronger evidence than a single reading, and small differences become a starting point for talking about measurement error.

Swapping the mirror for foil shows the difference between regular and diffuse reflection. Smooth foil sends the beam off in one direction like a mirror, while crumpled and flattened foil scatters it in many directions, because each tiny facet obeys the same law at a different angle. That is why we see our reflection in a mirror but not in a sheet of paper. If the light source is a laser, confirm its class at ordering and keep it at bench height so it cannot shine into anyone’s eyes.

Specifications

Item Laws-of-reflection experiment set
Light source Narrow-beam source, as shown in the listing image
Measuring surface Grid paper for drawing rays and measuring angles
Enclosure Clear acrylic case for observing the beam path
Reflecting surfaces Mirror and foil options
Light source type and power Confirm at enquiry

Applications

  • Verifying that the angle of incidence equals the angle of reflection
  • Comparing regular and diffuse reflection with smooth and crumpled foil
  • Locating the image in a plane mirror by ray tracing
  • Practising protractor measurement and table-and-graph recording

Care & Handling

  • Never look into the light source or point it at anyone; keep the beam horizontal at bench height.
  • Handle mirrors by the edges and store them so the reflecting face is not scratched.
  • Clean the acrylic case with a soft damp cloth only, since solvents and rough cloths cloud acrylic.
  • Replace the grid paper when it becomes marked, so old rays do not confuse new readings.

Why Choose LabEquip

Physics teachers from Class 6 upward use this set in practicals on light, and it is one of the optics experiment kits for schools that fits a single-period lab session. LabEquip lists it in the STEM kits range, and the Angle Between Two Mirrors Apparatus extends the work to multiple images. Send class-set numbers through the contact page.

Frequently Asked Questions

What are the two laws of reflection?

First, the angle of incidence equals the angle of reflection, both measured from the normal. Second, the incident ray, the reflected ray and the normal at the point of incidence all lie in the same plane.

Why are angles measured from the normal instead of the mirror surface?

The normal gives a single reference that works for flat and curved surfaces alike. Measuring from the surface also gives equal angles on a plane mirror, but the normal convention is used throughout optics, including refraction, so students learn it from the start.

What is the difference between regular and diffuse reflection?

Regular reflection happens at a smooth surface, where parallel rays stay parallel after reflecting and form a clear image. Diffuse reflection happens at a rough surface, where rays scatter in many directions, so no image forms even though each ray obeys the law of reflection.

Is a laser safe to use in a classroom?

Low-power laser pointers can be used under supervision if the beam is kept at bench level and never directed at eyes, including by reflection from shiny objects. Students should not handle the source unsupervised.

Why don’t my angles match exactly?

Small differences come from the width of the beam, the thickness of the pencil line, the exact position of the normal and reading the protractor. Taking several readings, averaging them and marking the centre of the ray carefully brings the values closer.

Can the kit be used to find the image in a plane mirror?

Yes. Trace two or more reflected rays from an object pin, extend them backward behind the mirror with dashed lines, and the point where they meet is the image. It lies as far behind the mirror as the object is in front.

Last Updated: September 2026

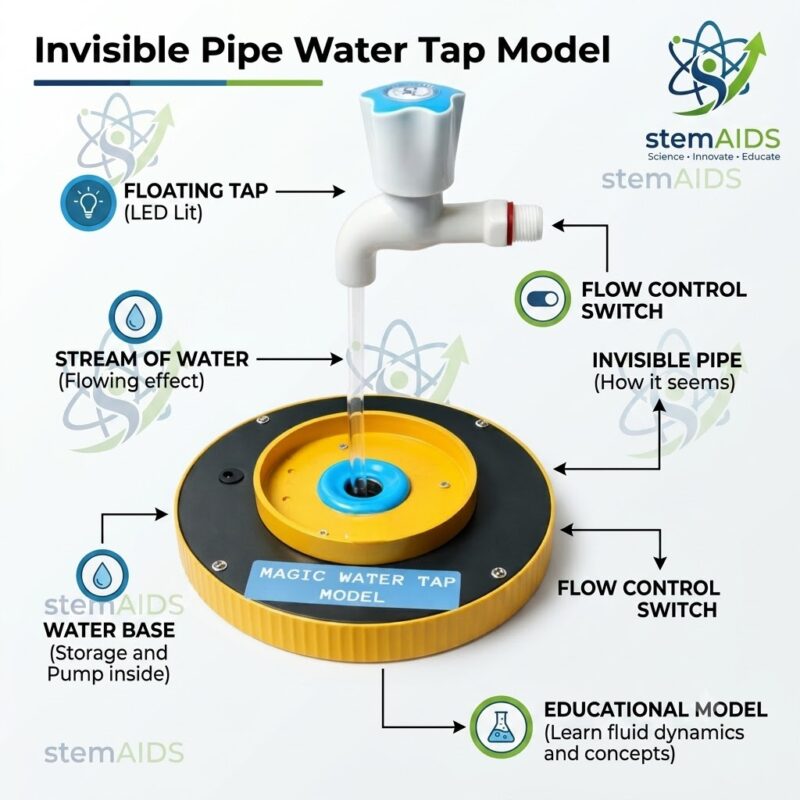
Invisible Pipe Water Tap Model

Quick Answer: The Invisible Pipe Water Tap Model is a floating-tap illusion: a tap appears to hang in mid-air pouring water with no supply pipe. In fact a small pump in the base sends water up a transparent tube that runs inside the falling stream, so the water flowing back down hides the pipe that feeds it.

The Trick Behind the Floating Tap

The listing image shows this invisible pipe water tap model as a tap held above a round water base, with the base housing the reservoir and pump and a switch for the flow. Water is pumped up a clear tube to the tap, spills out of the tap mouth and runs down around the outside of the same tube. Because the tube is transparent and wrapped in moving water, the eye sees only a stream.

Students enjoy being fooled for a moment, and then the real lesson begins. Why is the tube so hard to see? The rippling surface of the water film bends and scatters light, so the edges of the clear tube behind it are almost impossible to pick out. Why does the water keep coming? It is pushed up steadily by the pump, the same way a fountain or a building’s water supply relies on a pump to lift water against gravity.

The model also shows a closed water loop. The same water circulates from the reservoir to the tap and back, which links to lessons on pumps, on energy transfer from electrical to kinetic and gravitational energy, and on water reuse in fountains and cooling systems. The switch on the base lets a teacher start and stop the effect during an explanation.

Applications

  • Science exhibitions and school open days as an attention-grabbing display
  • Lessons on pumps and on lifting water against gravity
  • Discussing refraction and why transparent objects can seem to vanish
  • Critical-thinking starters where students explain an illusion before it is revealed

Specifications

Item Floating-tap illusion model
Hidden feed Transparent tube inside the falling water stream
Circulation Pump and reservoir in the base, as shown in the listing image
Control Flow on/off switch
Water used Clean tap water, recirculated
Power requirement and size Confirm at enquiry

Care & Handling

  • Keep the power connection and adaptor dry and away from splashes, and switch off before refilling.
  • Never let the pump run dry; top up the reservoir before switching on.
  • Change the water regularly and clean the reservoir so algae or scale cannot block the tube.
  • Drain the model completely before storage or transport.

Why Choose LabEquip

Schools, science centres and exhibition organisers usually buy this model for display tables, where it keeps visitors asking how it works. LabEquip lists it in the STEM kits range, and teachers building a lesson on moving water often add the Hand Pump Model, which lifts water by hand instead of by motor. Ask about quantities on the contact page.

Frequently Asked Questions

How does the tap stay in the air?

The tap sits on top of a clear tube that rises from the base. Because water runs down all around that tube, the tube is hidden, and the tap looks as if it is floating.

Where does the water come from?

A pump in the base draws water from the reservoir and pushes it up the inside of the clear tube. The water leaves through the tap, falls back into the reservoir and is pumped round again.

Why is the tube so hard to see?

The tube is transparent, and it is covered by a moving film of water whose rippling surface bends and scatters light. With no sharp edges for the eye to catch, the tube blends into the stream.

Can the model be left running all day at an exhibition?

Small fountain pumps are generally made for continuous running, but it is sensible to check the water level every few hours, keep the reservoir topped up and switch off when the display is unattended.

Can coloured water be used?

Yes, a few drops of food colouring make the stream easier to see in photographs. Use a colouring that washes out easily and rinse the reservoir afterwards so stains do not build up.

What science topics does the model support?

It supports lessons on pumps and pressure, on energy changes from electrical to kinetic and potential energy, on refraction of light, and on observing carefully before drawing conclusions.

Last Updated: September 2026

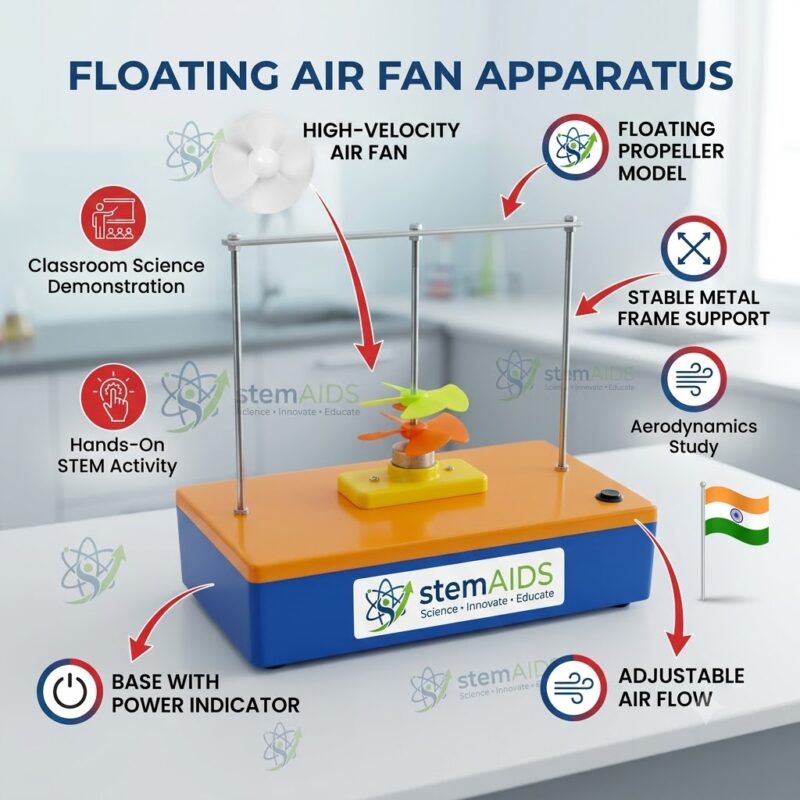
Floating Air Fan Apparatus

Quick Answer: The Floating Air Fan Apparatus is a powered classroom demonstration in which a motor in the base spins a light propeller until it produces enough lift to rise and hover, guided by a vertical rod in a metal frame. It shows students how a rotating blade pushes air down and is pushed up in return.

How the Propeller Floats

The listing image of the floating air fan apparatus shows a box-shaped base with a power switch and indicator, a small motor hub carrying a two-colour propeller, and a frame of metal rods with a central guide rising above the propeller. When the motor spins the propeller, its angled blades push air downward. By Newton’s third law the air pushes the blades upward, and once that lift exceeds the propeller’s weight, the propeller rises and floats along the guide.

Lift from a propeller depends on how fast it spins, the angle and area of its blades and the density of the air. Students can relate these to helicopters, ceiling fans and drones: a drone climbs by speeding up its rotors, hovers when lift equals weight and descends when the rotors slow. Watching the propeller settle at a steady height is a good way to introduce balanced forces.

The apparatus also links to air pressure. A propeller blade is shaped and angled so that the air pressure on its lower face ends up higher than on its upper face, the same reason an aircraft wing gives lift. Speed control, power source and the exact guide arrangement should be confirmed when ordering, since the listing does not state them.

Specifications

Item Powered propeller lift demonstration
Moving part Lightweight propeller on a motor hub
Frame Metal rods with a vertical guide, as pictured
Base Enclosed base with power switch and indicator, as pictured
Demonstrates Lift, thrust and balanced forces
Power source and speed control Confirm at enquiry

Applications

  • Introducing Newton’s third law with a visible lift force
  • Explaining hovering as balanced forces, with lift equal to weight
  • Linking school physics to helicopters, drones and fans
  • Science exhibition demonstrations on flight and aerodynamics

Care & Handling

  • Keep fingers, hair and loose clothing clear of the propeller while the motor runs, and switch off before adjusting anything.
  • Check the propeller for cracks or chipped blades; a damaged blade can vibrate or break at speed.
  • Run the apparatus on a flat, stable table with nothing overhead that the propeller could strike.
  • Disconnect the power after use and store the propeller where it will not be bent.

Why Choose LabEquip

Physics teachers and STEM club leaders usually buy this apparatus to open a topic on forces or flight with a demonstration that holds attention. LabEquip lists it in the STEM kits range, and it pairs naturally with the Water Propulsion Rocket Kit, where action and reaction come from expelled water instead of pushed air. Send quantities through the contact page.

Frequently Asked Questions

What makes the propeller rise?

The spinning blades throw air downward. The air exerts an equal and opposite force on the blades, pushing them upward. When this lift becomes larger than the weight of the propeller, it rises.

Why does the propeller hover instead of flying away?

A hovering propeller has upward lift exactly balancing its weight. If lift is greater it accelerates upward, and if the motor slows, lift falls and it sinks. The frame and guide keep its movement within a safe space.

How is this related to a helicopter?

A helicopter rotor is a large propeller that pushes air downward to produce lift. The pilot changes the blade angle and power to climb, hover or descend, the same balance of lift and weight seen in this apparatus.

Is the Floating Air Fan Apparatus the same as a ball floating on an air jet?

No. The floating ball demonstration uses a stream of air blowing upward past a ball, which is held in the jet by pressure differences. Here the propeller makes its own lift by spinning, so the upward force comes from the moving object itself.

What safety precautions are needed?

Keep the propeller area clear of fingers and loose items while the motor runs, let the blades stop fully before touching them, and supervise younger students. Use only the power source recommended for the apparatus.

Which classes can use this apparatus?

It works for middle-school lessons on forces and motion and for senior classes discussing Newton’s laws and lift. Exhibition visitors of any age can follow the demonstration, while older students can be asked to draw force diagrams of the hovering propeller.

Last Updated: September 2026

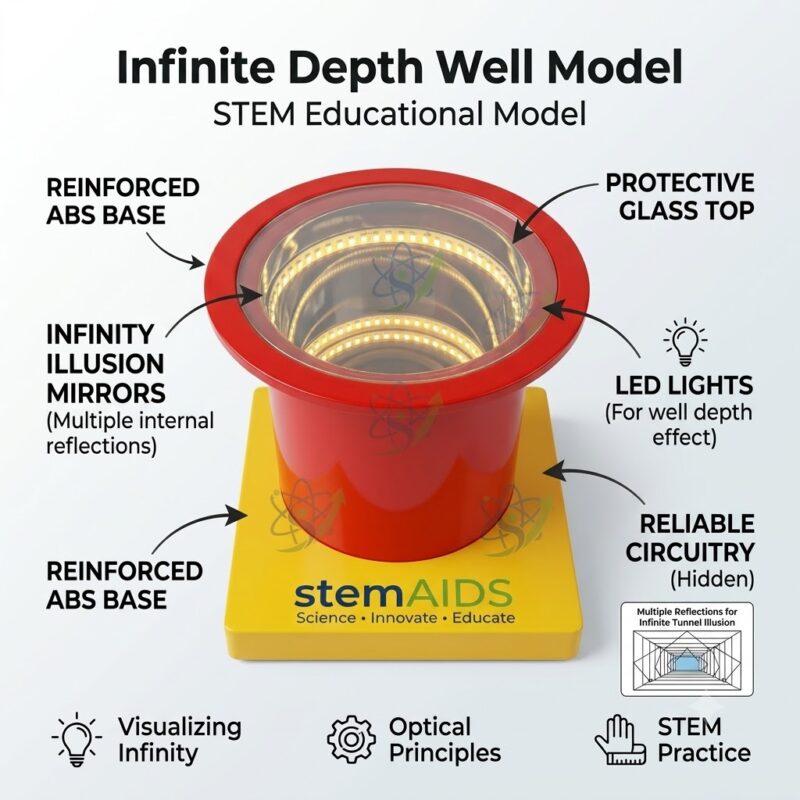
Infinite Depth Well Model

Quick Answer: The Infinite Depth Well Model is an optical illusion display shaped like a well: LEDs are set between a mirror below and a partly transparent glass top, and light reflecting back and forth makes the well appear to drop away without end. It is used to teach repeated reflection, virtual images and why the effect fades.

Why the Well Looks Bottomless

The listing image shows the infinite depth well model as a round, well-shaped vessel on a base, with LED lights around its inner wall, mirror surfaces inside and a protective glass top. The top glass is the key part: it reflects some light back down while letting the rest reach the viewer, so the well behaves as a pair of facing mirrors with the lights trapped between them.

Looking down, a viewer sees the ring of LEDs, then a second ring reflected from below, then a third after another round trip, and so on. Each ring appears one well-depth further down and therefore smaller, which is ordinary perspective, so the rings seem to form a narrowing shaft. Some light escapes or is absorbed at every reflection, so the lower rings dim and eventually vanish.

Compared with a wall-mounted infinity mirror, the well format invites people to lean over and look down, which is why it is popular at exhibitions and in science corners. Students can test the explanation themselves by shading the top glass, viewing from different angles, or switching off the room lights and noting how the apparent depth changes.

Applications

  • Science exhibitions and open days where visitors look into the well
  • Optics lessons on repeated reflection and virtual images
  • Discussing perspective: why equally spaced rings look smaller with depth
  • Critical-thinking starters in which students explain an illusion using physics

Care & Handling

  • Do not stand on or lean heavily on the glass top; it is a viewing cover, not a step.
  • Clean the top with a soft cloth and mild glass cleaner applied to the cloth.
  • Switch off and disconnect the power before moving the model.
  • Keep it indoors and away from spills, since water on the electrics is a hazard.

Specifications

Item Infinity well optical illusion display
Principle Multiple reflection between a mirror and a partly transparent top glass
Lighting LEDs around the inside wall, as shown in the listing image
Top Protective glass cover
Viewing From above, looking down into the well
Power supply and dimensions Confirm at enquiry

Why Choose LabEquip

Exhibition organisers, science-centre staff and schools setting up a physics corner usually buy this well for its immediate visual effect. LabEquip lists it in the STEM kits range next to the Infinite Reflection Mirror Model, a front-facing version of the same principle. Send your enquiry through the contact page.

Frequently Asked Questions

How does the infinite depth well create the illusion of depth?

Light from the LEDs bounces between a mirror below and a partly transparent glass above. Each bounce forms another image of the LED ring a little further down, so the rings stack into what looks like a deep shaft.

Why do the lower rings look smaller?

Each reflected ring appears further from the eye than the one above it. Objects further away look smaller, so the rings shrink with apparent depth, just as a straight road seems to narrow towards the horizon.

Is there any real depth inside the well?

Only the physical depth of the vessel. Everything below that is a virtual image formed by reflection, and measuring the outside of the model shows how shallow it really is.

Is this a model of a quantum potential well?

No. Despite the similar name, this is an optical mirror illusion. The infinite potential well of quantum physics is a mathematical model of a particle in a box, taught with equations and graphs rather than with a display like this.

Where should the well be placed for display?

On a low, stable table or on the floor in a dim area, so visitors can look straight down. Bright overhead lights reflecting off the top glass weaken the effect, so keep it away from windows and spotlights.

What do students learn from the well?

They practise explaining a striking illusion with the laws of reflection, partial transmission and perspective. It also shows that each reflection loses some energy, which is why the shaft fades instead of continuing forever.

Last Updated: September 2026

Select your currency
USD United States (US) dollar
×

No WhatsApp Number Found!

WhatsApp us
Exit mobile version